Picture framing is both an art and a craft that requires precision, creativity, and the right materials. Whether you’re a beginner looking to frame your first artwork or an experienced DIY enthusiast, understanding how to make a picture frame is essential for preserving and showcasing your cherished pieces. In this comprehensive guide, we’ll explore the complete process of creating picture frames, from selecting materials to mastering professional framing techniques that will enhance any artwork’s beauty and longevity. At Mussawir Framers, we believe that every piece deserves to be framed with precision, restraint, and respect for its essence.
Table of Contents
- Understanding Picture Frame Basics
- Essential Materials and Tools for Frame Making
- Step-by-Step Process: How to Make a Picture Frame
- Choosing the Right Frame Moulding
- Matting and Glass Selection
- Advanced Framing Techniques and Styles
- Conservation Framing Standards
- Frequently Asked Questions
- Professional Picture Framing Services
Understanding Picture Frame Basics
Before learning how to make a picture frame, it’s crucial to understand the fundamental components that make up a quality frame. A picture frame consists of several essential elements that work together to protect, preserve, and display your artwork beautifully.
The Four Main Components of Picture Frames
Frame Moulding: The decorative outer border that houses all other components. Frame moulding is available in countless styles, materials, and finishes, from classic wood to contemporary metals.
Mat/Mount: A decorative border between the artwork and the glass that provides depth and visual interest. Mats are typically made from acid-free cardboard or museum-quality materials.
Glass/Glazing: Protective covering that shields the artwork from dust, moisture, and UV damage. Options include standard glass, UV-protective glass, and anti-glare glass.
Backing: Support structure that holds everything together and provides stability. Archival-quality backing materials prevent deterioration of the artwork.
Essential Materials and Tools for Frame Making
When making picture frames, having the right materials and tools is absolutely essential. Learning how to make a picture frame effectively requires investment in quality supplies that ensure durability and professional results.
Materials Needed
- Frame moulding (wood, metal, or composite)
- Acid-free mat board in various colors
- Glass or acrylic glazing material
- Archival-quality backing board
- Acid-free mounting tape
- Wood filler and sandpaper
- Stain, paint, or wood finish
Essential Tools for Picture Frame Making
- Miter saw or chop saw for cutting frame moulding at precise 45-degree angles
- Mat cutting machine or mat cutter for creating precise apertures
- Glass cutter for custom-sized glass pieces
- Frame joining equipment (v-nails, wedges, or nail gun)
- Clamps and corner braces for alignment
- Measuring tape and ruler for accurate dimensions
- Pencil and marking tools for precise cutting lines
- Screwdriver and hardware for frame assembly and hanging
Step-by-Step Process: How to Make a Picture Frame
Now that you understand the components and have gathered your materials, let’s dive into the detailed process of how to make a picture frame. This step-by-step guide will help you create professional-quality frames that rival those from expert framing shops.
Step 1: Measure and Plan Your Design
Before cutting any materials, you must accurately measure your artwork. Measure the height and width of your piece in multiple locations to account for any irregularities. Plan your design by deciding on mat size, mat color, glass type, and frame moulding style. Consider how these elements will complement your artwork and enhance its visual impact. This planning stage is crucial when learning how to make a picture frame professionally.
Step 2: Select and Measure Frame Moulding
Choose your frame moulding based on your design vision. Calculate the length of moulding needed by adding the width and height of your final frame dimensions, then multiply by 2. Add an extra inch to account for potential waste. The frame moulding is the most important element of your frame design, as it will be the main focus of the overall composition.
Step 3: Cut Moulding at 45-Degree Angles
Using a miter saw, cut your frame moulding at 45-degree angles. Make four cuts: two for the width and two for the height. Precision is critical here, as even a quarter-inch error will prevent your frame from closing properly. Cut the longest sides first, then measure and cut the shorter sides to match. Double-check all measurements before making final cuts to avoid waste.
Step 4: Create the Mat with Precision Cutting
Cut your mat board to the exact dimensions of the inner frame. Using a mat cutter, create a window opening that will frame your artwork. A well-designed mat adds originality and value to your artwork by creating a visual separation between the image and the glass. You may prefer a single mat with a simple window or more complex designs with double or triple mats that create depth.
Step 5: Prepare Glass and Backing
Cut your glass or acrylic to the inner frame dimensions. Clean it thoroughly to remove dust and fingerprints. Prepare your backing board by cutting archival-quality material to match the frame’s inner dimensions. The backing provides support for your artwork and prevents damage from external elements.
Step 6: Join the Frame Corners
Assemble the four pieces of moulding using your corner joining method. If using v-nails, place them in the joining machine and align the corners precisely. If using wedges, insert them into the frame grooves. Use clamps to hold corners at right angles while securing. A well-joined frame will be square and have no gaps at the corners.
Step 7: Mount Your Artwork
Carefully place your artwork on the mat opening. Use acid-free mounting tape or hinging tape to secure the artwork without damaging it. Never use regular tape or rubber cement, as these damage artwork over time. Position the artwork so it sits centered in the window and won’t shift.
Step 8: Assemble Frame Sandwich
Layer all components in order: glass first, then mat with mounted artwork, backing board, and dust cover. Ensure everything is clean and aligned before assembly. This ‘sandwich’ creates the complete framing package that protects your artwork.
Step 9: Finish and Protect
Apply a protective finish to the exterior of your frame using stain, paint, or wood sealer. This enhances the appearance and protects the wood from moisture and dust. Add hanging hardware, felt bumpers, and protective backing to complete your frame.
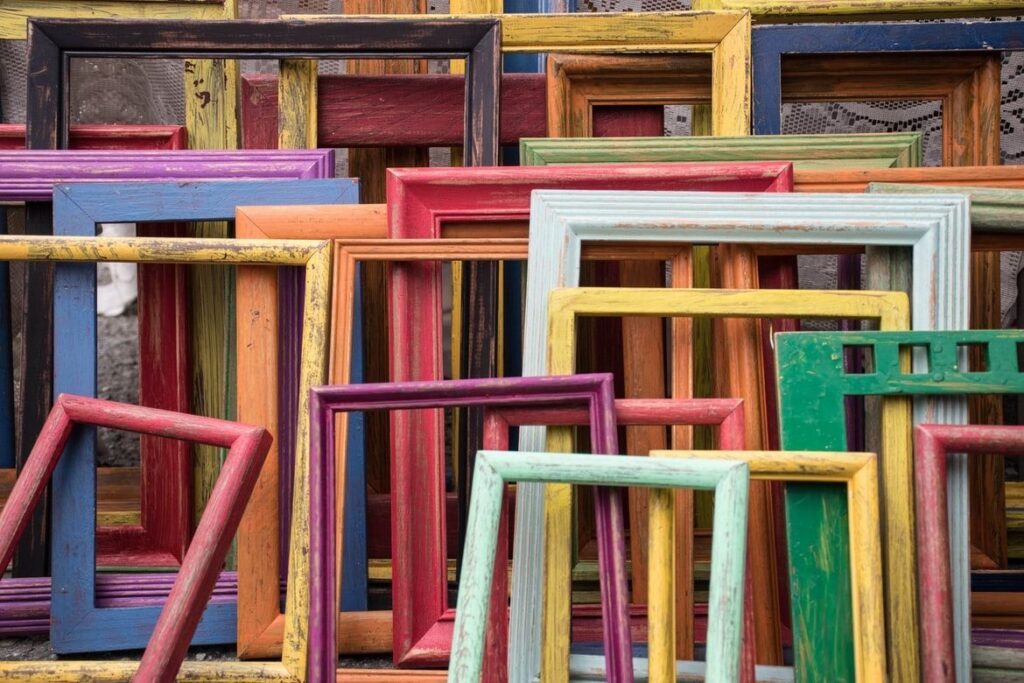
Choosing the Right Frame Moulding
When learning how to make a picture frame, understanding frame moulding options is essential. The frame moulding is the single most important element of your frame, as it will be the main focus of your frame’s design.
Wood Moulding Styles
- Contemporary: Clean lines and minimalist design perfect for modern artwork
- Traditional: Ornate profiles with classic finishing for timeless elegance
- Transitional: Blends contemporary and traditional elements
- Heritage: Authentically reproduced historical profiles for period pieces
Metal and Composite Moulding
Metal frames offer contemporary appeal and durability. Aluminum frames are lightweight and available in numerous finishes. Composite mouldings provide cost-effective alternatives with excellent durability. When making custom picture frames, consider how the moulding material will interact with your artwork and room decor.
Color and Finish Selection
Select frame colors that complement your artwork without overwhelming it. Neutral tones like black, white, and natural wood work with almost any piece. Bold colors should be chosen carefully to enhance specific artworks. Consider how the frame finish—matte, glossy, or textured—will affect the overall presentation.
Matting and Glass Selection
Matting and glazing are crucial components when making picture frames. These elements protect your artwork while enhancing its visual presentation through careful material selection.
Mat Styles and Designs
Single Mat: A classic window effect that showcases your artwork while providing a clean border
Double Mat: Creates more depth by layering two mats, often with a colored inner mat creating an accent line
Triple Mat: Multiple mat layers create sophisticated dimensionality for fine art displays
Multi-Aperture: Multiple windows in one mat to showcase several items in a single frame
Mat Colors and Core Options
Mats are available in white, off-white, black, cream, and many colored options with colored cores. The mat color should complement your artwork and create visual interest. Colored core mats reveal contrasting colors at the beveled edge, creating a sophisticated border effect. When making picture frames professionally, choose archival-quality mat boards that won’t deteriorate or damage artwork over time.
Glass and Glazing Options
- Clear Glass: Standard option that provides excellent clarity
- UV-Protective Glass: Filters harmful ultraviolet rays to prevent fading
- Anti-Glare Glass: Reduces reflections for better viewing angles
- Conservation Glass: Combines UV protection with anti-glare properties
- Acrylic: Lightweight and shatter-resistant alternative for safety
Advanced Framing Techniques and Styles
As you become more skilled in how to make a picture frame, you can explore advanced techniques that create sophisticated displays for different artwork types.
Canvas Frame Mounting
Canvas artwork requires different handling than works on paper. We offer multiple options including tray frames and deep rebated box frames designed to accommodate canvas depth. For rolled canvases, stretching services are available to prepare them for proper framing.
Shadow Box Framing
Shadow box frames feature increased depth to accommodate three-dimensional objects like medals, memorabilia, or delicate items. This style combines protection with display, showcasing dimensional pieces beautifully.
Float Mounting
Float mounting suspends artwork within the frame, creating a sophisticated presentation where the entire piece is visible, including all edges. This technique works beautifully with textured or unusual shaped artwork.
Specialty Mat Designs
Filet mats create elegant inner borders with contrasting colors. Beveled mats feature angled edges for visual interest. Custom mat cutouts showcase specific portions of artwork or display multiple pieces together. These specialty techniques elevate your custom framing from functional to truly artistic.
Conservation Framing Standards
When making picture frames, especially for valuable or sentimental pieces, conservation standards must be followed. At Mussawir Framers, we always frame to conservation standards, which preserve precious artwork in frames that protect it from harmful outside influences while assuring it always remains in its original condition.
Acid-Free Materials
All materials touching your artwork should be acid-free and archival quality. Acid causes yellowing, brittleness, and deterioration over time. When learning how to make a picture frame properly, always use acid-free mat board, backing, tape, and adhesives.
Proper Mounting Techniques
Never use rubber cement, regular tape, or adhesive directly on valuable artwork. Conservation-approved mounting techniques include hinging with acid-free tape or mounting corners that support artwork without adhesive. These reversible methods preserve artwork for future generations.
UV Protection
Ultraviolet light causes fading and deterioration of artwork. Conservation framing requires UV-protective glazing that blocks 99% of harmful rays while maintaining visual clarity. This investment in quality materials ensures your artwork remains vibrant for decades.
Frequently Asked Questions
Q: What is the most important step when learning how to make a picture frame?
A: Accurate measurement is the most critical step. Even small measurement errors will compound throughout the project, resulting in frames that won’t close properly. Take multiple measurements and double-check all calculations before cutting any materials.
Q: Can beginners successfully learn how to make a picture frame?
A: Absolutely! Many beginners successfully create beautiful frames by following proper procedures and investing in basic tools. Start with simpler designs and work up to more complex techniques. Professional guidance through classes or consultation can accelerate your learning.
Q: What tools are absolutely essential when making picture frames at home?
A: A miter saw for cutting angles, a mat cutter or cutting system, and frame joining equipment are essential. You can start with basic hand tools, but precise equipment makes the process easier and results more professional.
Q: How do I choose between different types of frame glass?
A: Consider the artwork’s value and longevity. For precious or valuable pieces, UV-protective or conservation glass is worth the investment. For temporary displays, standard clear glass is fine. Anti-glare glass works well in brightly lit spaces.
Q: What is the difference between acid-free and regular mat board?
A: Acid-free mat board is specifically manufactured to preserve artwork without chemical degradation. Regular mat board contains lignin and other acids that yellow over time and damage artwork. For any piece you want to preserve long-term, acid-free materials are essential.
Q: How long does it take to learn how to make a picture frame professionally?
A: Basic frames can be completed in a few hours once you have materials and tools. Mastering advanced techniques and developing speed takes months or years of practice. Most people can create acceptable results within their first few projects.
Q: Is it more cost-effective to make frames yourself or use professional services?
A: Initial tool investment makes DIY framing more expensive for first projects. However, after the initial investment, creating frames yourself is cost-effective. For valuable artwork or complex designs, professional services offer expertise and quality guarantees that justify the cost.
Q: How should I store materials when learning how to make picture frames?
A: Store mat board, backing, and mounting materials flat in a dry environment away from direct sunlight. Keep glass protected from dust and scratches. Moulding should be stored vertically or horizontally depending on dimensions. Proper storage preserves material quality and prevents waste.
Professional Picture Framing Services from Mussawir Framers
While learning how to make a picture frame can be rewarding, professional framing services offer numerous advantages. At Mussawir Framers, we combine decades of expertise with premium materials to create stunning frames that preserve and showcase your artwork.
Why Choose Professional Picture Framing?
- Expert consultation on design, materials, and techniques specific to your artwork
- Access to extensive collections of frame mouldings, mats, and glazing options
- Conservation-standard framing that protects valuable artwork from damage
- Professional equipment that ensures perfect measurements and cuts
- Quality guarantees and satisfaction assurances on finished frames
- Time and effort savings when framing multiple pieces or complex artwork
Our Framing Philosophy
At Mussawir Framers, we don’t just frame artworks and things – we complete them. From contemporary and blue-chip artworks to personal heirlooms, each piece is framed with precision, restraint, and respect for its essence. We understand that items of artwork can have great value, both financially and sentimentally. Therefore, we provide professional framing services to all clients who want their precious pieces secured and well looked after. Our team takes pride in delivering design, craftsmanship, and attention to detail that elevates every piece we frame.
Services We Offer
- Custom picture framing for artwork, prints, and photographs
- Canvas mounting and stretching services
- Conservation framing for valuable and sentimental pieces
- Ready-to-buy framing collection with pre-selected styles
- Design consultation to help select perfect frame for your artwork
Conclusion
Learning how to make a picture frame is an excellent way to develop a valuable skill while creating beautiful displays for your artwork. Whether you choose to create frames yourself or rely on professional services, understanding the fundamentals of frame-making, material selection, and conservation standards ensures that your artwork receives the protection and presentation it deserves. From selecting frame moulding and mats to mastering professional joining techniques, each step in the frame-making process contributes to the final result. The investment in quality materials and proper technique pays dividends through frames that protect your artwork for decades while enhancing its visual impact. For those seeking expert guidance, comprehensive material selection, or professional execution, Mussawir Framers stands ready to transform your artwork into a stunning focal point for any space. Visit our collection today to explore our ready-to-buy frames or schedule a consultation for custom picture framing that perfectly complements your unique pieces.
Expert Framing Services in Umm Suqeim, Dubai
Premium Framing Services In Al Manara Dubai